Cere Insight
Getting Started
Cere Insight is a cutting-edge SaaS platform designed for businesses and individuals looking to harness the power of artificial intelligence for enhanced customer interactions. It empowers users to create intelligent AI Agents using their unique data sources, be it PDFs, Word documents, spreadsheets, or websites. By seamlessly integrating and training on this proprietary data, Cere Insight ensures that each AI Agent is tailor-made to serve specific informational needs, ensuring precise and context-aware responses. Whether you're aiming to improve customer support, drive sales, or gather insights, Cere Insight is the reliable assistant you've been seeking.
Bot Creation & Setup
Creating a AI Agent tailored to your specific informational needs is a straightforward process with Cere Insight. Here's a step-by-step guide to help you get started:
Step 1: Navigate to the Bot Management Page
Begin by going to the following URL: Manage Bots.
Step 2: Initiate Bot Creation
Once on the page, locate and click the Create Bot Instance button. This will take you to the bot creation form.
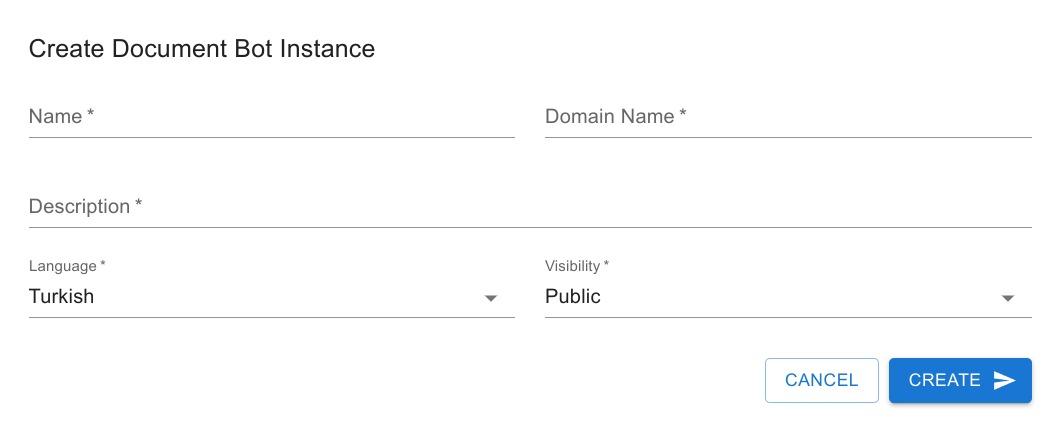
Step 3: Complete the Bot Details
- Name: Enter a distinctive name for your bot. This helps you easily identify the bot amongst others you might create.
- Description: Provide a brief description outlining the primary purpose or function of your bot. This could relate to its role, such as Customer Support or Product Inquiry.
- Domain Name: Here, specify the address for your bot. It will follow the format:
yourdomainname.cereinsight.com. Ensure the domain name chosen is relevant to your bot's purpose and easy to remember. - Language: Select the desired response language for your bot. This determines the language in which your bot will communicate with users.
- Visibility: Choose between making your bot public (accessible to everyone) or private (for your use only). If you're testing or piloting the bot, you might want to keep it private initially.
Step 4: Finalize Creation
Review the details you've entered to ensure accuracy. Once satisfied, click the Createbutton. Your bot instance will then be created and ready for the next stages of configuration and training.
Congratulations! You've taken the first step in harnessing the power of Cere Insight. Proceed with integrating data sources and training your bot for optimal performance.
Training Bots
Training your bot on specific topics is a fundamental step in ensuring it provides accurate and relevant responses to user queries.Here's a detailed guide on how to train your bot with Cere Insight:
Step 1: Accessing the Bot Management Panel
Navigate to CereBot.
Look for the bot you wish to train and click on the gear icon located next to its name. This will lead you to the bot management panel.
Alternatively, you can access the management panel directly by visiting the URL: yourdomainname.cereinsight.com/admin.
Step 2: Initiate Training with Sources
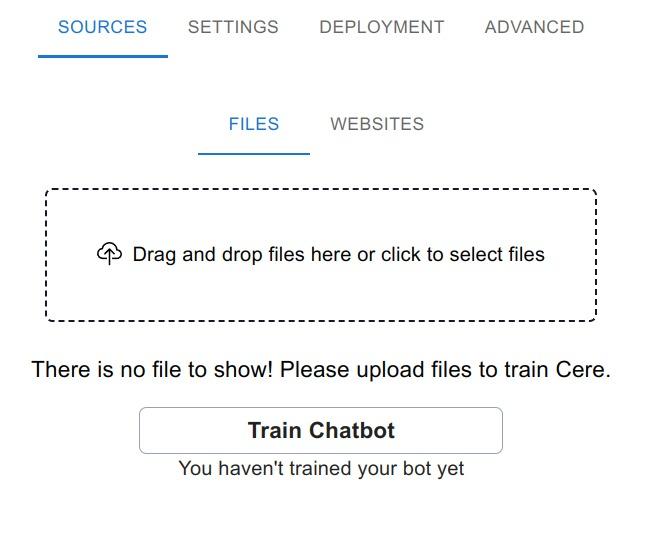
After logging in to the management panel, locate and click on the 'Sources' tab. This is where you'll upload or provide data for training.
Step 3: Uploading Files for Training
Inside the Sources tab, you'll find two sub-tabs: 'Files' and 'Websites'
On the 'Files' tab, simply drag and drop the desired documents, or browse and select them. Once selected, click the upload button to add them as training material.
Supported Document Types for Training:
- PDF (
application/pdf) - Plain Text (
text/plain) - CSV (
application/csvandtext/csv) - Microsoft Word (
application/mswordandapplication/vnd.openxmlformats-officedocument.wordprocessingml.document) - Microsoft PowerPoint (
application/vnd.ms-powerpointandapplication/vnd.openxmlformats-officedocument.presentationml.presentation) - JSON (
application/jsonandapplication/jsonl) - HTML (
text/html) - RTF (
text/rtf) - Markdown (
text/markdown) - Microsoft Excel (
application/vnd.ms-excelandapplication/vnd.openxmlformats-officedocument.spreadsheetml.sheet) - JPEG Images (
image/jpeg) - PNG Images (
image/png) - Email (
message/rfc822) - OpenDocument Text (
application/vnd.oasis.opendocument.text)
Step 4: Using Website Data for Training
Navigate to the 'Websites' tab.
Here, you have the flexibility to either provide links to individual web pages or supply sitemap URLs that encapsulate all pages of a particular website. Adding sitemaps ensures comprehensive data extraction from websites.
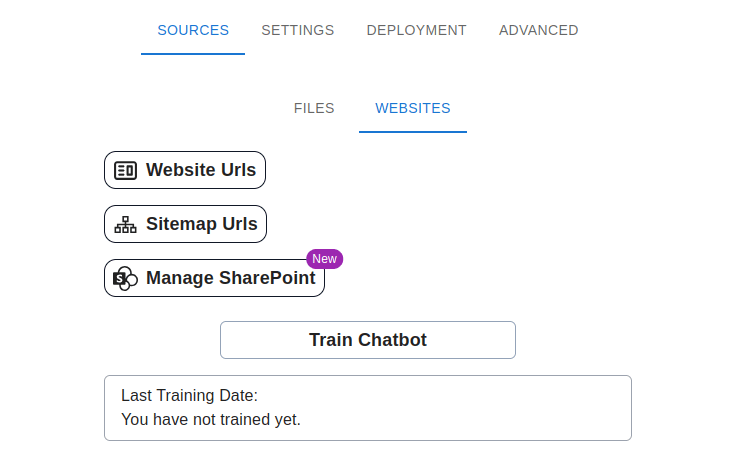
You can use your files in SharePoint directly for training Cere Insight bots. To perform this process, the Customer ID, Customer Key provided by the Microsoft admin, and the library ID you want to add should be saved through the Resources > Web Sites > SharePoint Management menu.
Step 5: Initiate the Training Process
After loading all desired training materials, click on the 'Train'button.
Note that the training process duration varies based on the size and complexity of the uploaded materials. Larger datasets might take longer.
Step 6: Await Training Completion Notification
Once training commences, the platform processes all the provided data. Upon successful completion of this training phase, an email notification will be sent to the account owner detailing the outcome.
After receiving the confirmation email and ensuring successful training, your bot is now primed and ready for use!
Deployment
After rigorous training, your bot is fully equipped to handle queries and is ready for deployment. The final step is putting your bot to work in a real-world scenario. Let's break down how to go about it:
Step 1: Accessing Your Bot
Your bot is live and can be accessed directly at yourdomainname.cereinsight.com.
Simply click on the 'Go to Chat Bot' button, and you'll be taken to your bot's chat interface.
Step 2: Deploying On Your Website
In the management panel, there's a dedicated tab labeled 'Deployment'. This is your hub for all the tools and codes you need to integrate the bot into different platforms. Here are your options:
a. Embed Chat Bubble on Website
If you want to add a persistent chat bubble on the bottom right corner of your website, allowing users to engage with the bot at any time:
<script data-src="https://[yourdomain].cereinsight.com" src="https://widget.ceremeet.com/widgetScript.js"></script>
Paste the script tag above to your website's HTML where you typically place scripts (often before the closing </body> tag).
b. Embed Anywhere on Your Website Using an Iframe
For a more embedded and integral appearance, you can place the AI Agent anywhere on your site using an iframe:
<iframe src="https://ahmetiletest.cereinsight.com" width="100%" style="height: 100%; min-height: 700px" frameborder="0"></iframe>
Add the iframe code to your HTML where you want the AI Agent to appear.
c. Direct Link Access
Want to share the bot or test it quickly? Use the direct link:
Step 3: Adjusting Bot Visibility
Below the deployment tools in the management panel, there's an option to adjust your AI Agent's visibility. This is where you can determine if you want your bot to be visible to everyone or just specific users.
With these steps, your bot is not just trained but is actively deployed, ready to interact and assist users on your platform. Happy chatting!
Customization
The customization capabilities of Cere Insight allow you to ensure that your bot not only feels functional but also looks and sounds aligned with your brand's aesthetics and tonality.Let's break down the customization options:
Theme Customization
This tab offers visual customization options to give your AI Agent a unique look and feel.
1. Profile Images
**Bot Profile Image**
Current Image: bot-image
To change, click on the placeholder or drag and drop a new image into the designated area.
**User Profile Image**
Current Image: bot-image
To change, click on the placeholder or drag and drop a new image into the designated area.
2. Theme Colors
You can adjust various color attributes of the chat interface here. The fields are:
- Main Page Background Color
- Cere Message Background Color
- Cere Message Text Color
- User Message Background Color
- User Message Text Color
- Readymade Questions Background Color
- Readymade Questions Text Color
- Chat Area Background Color
- Text Area Background Color
- Text Area Text Color
Once you've made your desired changes, you can either cancel or save them by clicking the respective buttons.
Chat Customization
This tab allows you to customize the interactive elements and functionalities of the AI Agent.
- **Opening Message:** The opening message of the bot.
- **Company Name:** The company name that the AI bot works for.
- **Bot Word Type:** How friendly the bot should talk
- **GPT Model:** The language model of the bot
- **Source Visibility:** The visibility of the source documents in the chat window.
2. Bot Voice Settings
This segment provides customization options for the auditory aspects of the bot.
- **Bot Voice Name:** The tone of the bot voice
- **Bot Answer Language:** The language of the bot's answers
Each section can be edited by clicking on the 'Edit' button, allowing you to input or choose your preferred settings.
Sample Questions Customization
Here, you can predefine some questions that users might ask frequently or ones you'd like to highlight:
- What is cerebrum?
- What is your name?
- What is Cere Insight?
After making any modifications to the list, click 'Update Questions' to save the changes.
Best Practices for Cere Insight Bot Training
Ensuring that your AI Agent provides optimal responses is crucial for enhancing user experience. To help you get the most out of your Cere Insight AI Agent, here are some best practices:
Ensure Readability of Uploaded Data Sources
- The quality of data sources directly impacts the bot's response accuracy. Ensure that uploaded PDFs or websites contain readable text.
- Cere Insight can't process images, videos, or non-textual elements. For non-scraper-friendly websites, consider copying the information as text or uploading it as a PDF.
- Always make sure that all documents you provide are encoded in UTF-8 format. This ensures compatibility and proper text processing by Cere Insight.
- After the training process, always check the report email. It might contain essential information about any potential errors or issues that occurred during the learning process.
Guideline for Document and Website Preparation for Cere Insight
To ensure the most accurate and efficient results from our semantic search app, it's vital that you prepare your documents and websites as per the guidelines below. Adhering to these guidelines will optimize the search performance and provide users with the best experience.
Documents:
Format:
Text-based PDFs: Ensure your documents are saved as text-based PDFs. Avoid non-text PDFs as they can be difficult for the semantic search to process and may not yield accurate results.
CSV Files: Ensure that CSV files are comma-separated to maintain uniformity and ease of parsing.
Content and Layout:
Images: Documents containing images may not be parsed correctly. Exclude or avoid documents with embedded images.
Columns: Multi-column layouts can interfere with the search's ability to parse and understand the content. Stick to single-column formats.
Clarity:
Structured Titles and Headings: Properly structure your document with relevant titles and headings. This helps the search tool understand the context and hierarchy of information.
Consistency:
Uniform Encoding: Ensure all documents use the same character encoding, preferably UTF-8.
Standard Terminology: Use consistent terminology and phrasing throughout documents.
Metadata:
Descriptive Filenames: Name files descriptively to offer a quick insight into their contents.
Document Properties: Fill out properties like author, title, and description.
Avoid Duplication:
Ensure content isn't duplicated across multiple documents.
Websites and Sitemaps:
Bot Accessibility:
Robot.txt: Ensure your robot.txt file allows search engine crawlers to access relevant pages.
Meta Tags: Use meta tags to provide a brief description of each page's content.
Content Layout:
Clear Navigation: Maintain clear and logical navigation.
Avoid Flash or Heavy JavaScript: Opt for HTML and CSS-based layouts.
Sitemaps:
Update Regularly: Ensure the sitemap is regularly updated.
XML Format: Ensure the sitemap is in XML format.
Semantic HTML:
Use of HTML5 Elements: Utilize semantic HTML5 elements like <article>, <section>, and <nav>.
Clean URLs:
Descriptive URLs: Ensure URLs are clean and descriptive.
Content Behind Login Walls:
Ensure crucial content isn't hidden behind login walls or paywalls.
External Links and References:
Check for Broken Links: Regularly audit the website.
Descriptive Anchor Text: Use clear and descriptive anchor text for hyperlinks.
Accessibility:
Ensure your website is accessible (e.g., using WAI-ARIA).
Content Updates:
Date Stamps: Include date stamps where applicable.
By following these guidelines, your documents and websites will be primed for optimal performance with our semantic search tool. We appreciate your dedication to ensuring the best results and experience for all users.